
Application Guides / Decision Guide
Outdoor Gate Smart Lock Selection Checklist
Gate movement, frame geometry and both-side exposure make outdoor selection different from a sheltered entrance-door project.
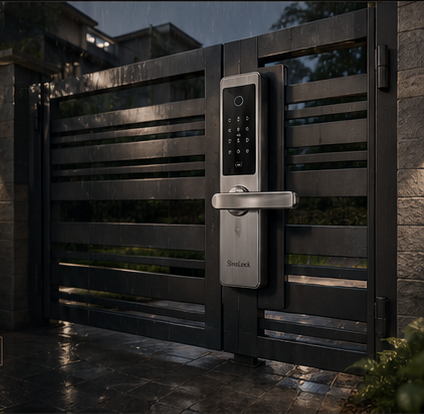
Gate material, section size, thickness and internal access
Single/double leaf, opening direction, hinges and movement
Frame, keeper, gap, sag and latch engagement
Direct rain, rear-panel exposure, sun and coastal conditions
Decision Context
What This Guide Helps You Confirm
Begin with the gate and frame. Thin metal sections, movement, wide gaps, double leaves and exposed rear panels can eliminate otherwise attractive lock options.
Then review weather, materials and electronics. A waterproof claim should be tied to the exact model and installed orientation, with practical access to the battery, emergency port and mechanical key.
The image slot is reserved for product structure, door condition, material, installation, OEM or quality evidence related to this guide.
Supporting Evidence
Connect the Written Checklist to the Real Product or Door
Use the selected model, representative door and available documents together. Avoid treating a generic image, one feature name or one test value as a complete purchasing decision.
- Keep the candidate model and configuration visible.
- Use labeled photos or drawings instead of loose descriptions.
- Record uncertain items for confirmation before quotation.
- Retain the approved evidence for sample and production review.
Decision Table
Gate Lock Direction Matrix
Use the table to compare options on the same physical, operational and evidence basis.
| Gate condition | Possible direction | Critical check | Evidence |
|---|---|---|---|
| Surface-mount gate | Rim/gate lock direction. | Stable mounting plate and keeper alignment. | Photos, section dimensions and trial fit. |
| Prepared mortise gate | Mortise waterproof or profile direction. | Pocket, backset, cable and edge plate. | Door drawing and mortise dimensions. |
| Narrow profile | Profile-door smart lock direction. | Stile width, internal cavity and fixing access. | Cross-section drawing and sample installation. |
| Both sides exposed | Selected double-sided/weather-conscious direction. | Rear-panel sealing and battery access. | Model-specific exposure evidence. |
Buyer Process
Select an Outdoor Gate Lock
Move from site or project evidence to a documented model and supply decision.
Photograph both sides, frame, hinges, shelter and surrounding wall.
Record profile sizes, thickness, keeper and movement.
Separate sheltered, directly exposed and coastal conditions.
Compare rim, mortise, profile or double-sided options.
Review reports, backup methods, maintenance and sample installation.
Evidence Boundaries
What This Guide Should Not Be Used to Assume
These cautions keep material, technology, installation and report language tied to the selected model and real site.
Lock quality cannot compensate for loose hinges or an unstable keeper.
Check rain and sun on both sides before selecting the configuration.
Plan fabrication and corrosion protection before final installation.
Related Guidance
Continue With Related Product and Project Guidance
Review related guides, product information and support options to close the remaining technical and purchasing questions.
Buyer FAQ
Questions Buyers Ask Before Confirmation
Answers stay cautious where model, market, door or final configuration can change the result.
What is the best smart lock for a metal gate?
The best direction depends on section size, mounting, gap, exposure and user workflow. Rim, mortise, profile and double-sided solutions serve different structures.
Can an outdoor gate use an app smart lock?
Yes on selected configurations, but connectivity, gateway position, account workflow and backup access should be reviewed.
Should I install the lock before fixing gate alignment?
No. Stabilize hinges, frame and keeper alignment first.
Ready to Confirm?
Start with the gate structure and exposure.
Send full gate photos, dimensions, opening direction and weather conditions. SivoLock can review the realistic mounting and product routes.
Inquiry Preparation
Turn this guide into a clear supplier inquiry.
Summarize the relevant facts in your RFQ, attach supporting files, and request confirmation for the selected model.
Include application, door data, model preference, quantity, market and the exact document or evidence requested.
Door photos, measurements, drawings, sample records and artwork files reduce back-and-forth.
If the article mentions a report, certification, IP rating or test, request availability for the exact SKU.
| Decision area | Confirm before quotation | Claim boundary |
|---|---|---|
| Inquiry line | We are reviewing Outdoor Gate Smart Lock Selection Checklist; please confirm the suitable SivoLock model route. | Gives the supplier a clear, answerable request. |
| Required inputs | Door/application details, target market, quantity, sample timing and preferred functions. | Provides the technical and commercial context needed for a useful response. |
| Evidence request | Datasheet, installation guide, report availability, sample photos or approval files as relevant. | Keeps requested documents tied to the selected model. |
| Follow-up | Continue with the relevant product, material or support information after listing the open questions. | Keeps unresolved requirements visible for supplier confirmation. |
Can this guide replace a final datasheet?
No. Use it to prepare the buying conversation, then confirm selected-model values, reports and packaging details from the latest SivoLock response.
What happens when a value is not available yet?
Leave it open and mark it as configuration-dependent. Do not turn missing certification, IP, factory or test evidence into a public claim.
Send the confirmed inputs and keep any missing proof as an open request. SivoLock can respond with model-specific options, document availability and quotation questions.