
Installation Guides / Decision Guide
How to Measure Door Thickness, Backset and Mortise
Three measurements can prevent many installation mismatches, but they must be taken from the real door and existing lock body, not estimated from a front photo.
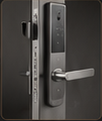
Door thickness at the lock position, excluding loose trim
Backset from door edge to spindle or cylinder centerline
Mortise body height, depth, width and faceplate dimensions
Spindle, cylinder, screw and cable-hole locations
Decision Context
What This Guide Helps You Confirm
Door thickness affects spindle, screws and cylinder length. Backset locates the handle or cylinder from the door edge. Mortise dimensions determine whether the lock body fits the existing pocket and edge preparation.
Measure in millimeters, photograph the tape or caliper in place and include the door edge, frame and current lock. For irregular metal or profile doors, a dimensioned drawing is more reliable than isolated numbers.
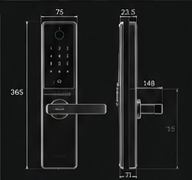
The image slot is reserved for product structure, door condition, material, installation, OEM or quality evidence related to this guide.
Supporting Evidence
Connect the Written Checklist to the Real Product or Door
Use the selected model, representative door and available documents together. Avoid treating a generic image, one feature name or one test value as a complete purchasing decision.
- Keep the candidate model and configuration visible.
- Use labeled photos or drawings instead of loose descriptions.
- Record uncertain items for confirmation before quotation.
- Retain the approved evidence for sample and production review.
Decision Table
Measurement Reference
Use the table to compare options on the same physical, operational and evidence basis.
| Measurement | Where to measure | Common mistake | Useful evidence |
|---|---|---|---|
| Door thickness | Across the door leaf at the lock position. | Including removable decoration or measuring elsewhere. | Photo with ruler or caliper. |
| Backset | Door edge to the relevant spindle/cylinder center. | Measuring to the panel edge instead of centerline. | Annotated door-edge photo. |
| Mortise | Body and faceplate dimensions after safe removal. | Reporting only faceplate height. | All-side photos and dimension sketch. |
| Door gap | Clearance between leaf and frame at latch area. | Ignoring seals, sag or warped frames. | Closed-door and open-edge photos. |
Buyer Process
A Safe Measurement Sequence
Move from site or project evidence to a documented model and supply decision.
Record the installed lock, door edge, frame and opening direction.
Only proceed if authorized and able to restore the door securely.
Use consistent reference points and millimeters.
Place all dimensions and photos in a single labeled document.
Compare the proposed lock and mortise drawing before drilling or ordering.
Evidence Boundaries
What This Guide Should Not Be Used to Assume
These cautions keep material, technology, installation and report language tied to the selected model and real site.
Mark the exact reference point on a photo instead of sending one unlabeled number.
Narrow stile width, internal cavities and fixing points may control fit.
Use the final model drawing and installation template.
Related Guidance
Continue With Related Product and Project Guidance
Review related guides, product information and support options to close the remaining technical and purchasing questions.
Buyer FAQ
Questions Buyers Ask Before Confirmation
Answers stay cautious where model, market, door or final configuration can change the result.
Can I measure without removing the existing lock?
Some dimensions can be estimated, but mortise body and fixing details are more reliable after safe removal or from original drawings.
What unit should I use?
Millimeters are preferred. Keep all dimensions in one unit and show the measuring tool in photos.
Does opening direction matter for smart locks?
Yes. Handing, swing direction and hinge side can affect handle orientation, latch setup and installation.
Ready to Confirm?
Send measurements with labeled photos.
Share the door thickness, backset, mortise and opening direction together. SivoLock can review candidate model directions before you modify the door.
Inquiry Preparation
Turn this guide into a clear supplier inquiry.
Summarize the relevant facts in your RFQ, attach supporting files, and request confirmation for the selected model.
Include application, door data, model preference, quantity, market and the exact document or evidence requested.
Door photos, measurements, drawings, sample records and artwork files reduce back-and-forth.
If the article mentions a report, certification, IP rating or test, request availability for the exact SKU.
| Decision area | Confirm before quotation | Claim boundary |
|---|---|---|
| Inquiry line | We are reviewing How to Measure Door Thickness, Backset and Mortise; please confirm the suitable SivoLock model route. | Gives the supplier a clear, answerable request. |
| Required inputs | Door/application details, target market, quantity, sample timing and preferred functions. | Provides the technical and commercial context needed for a useful response. |
| Evidence request | Datasheet, installation guide, report availability, sample photos or approval files as relevant. | Keeps requested documents tied to the selected model. |
| Follow-up | Continue with the relevant product, material or support information after listing the open questions. | Keeps unresolved requirements visible for supplier confirmation. |
Can this guide replace a final datasheet?
No. Use it to prepare the buying conversation, then confirm selected-model values, reports and packaging details from the latest SivoLock response.
What happens when a value is not available yet?
Leave it open and mark it as configuration-dependent. Do not turn missing certification, IP, factory or test evidence into a public claim.
Send the confirmed inputs and keep any missing proof as an open request. SivoLock can respond with model-specific options, document availability and quotation questions.