Article contents 19 sections
A smart lock fits a door when six things line up: the door's finished thickness, the mounting space on both faces, the existing holes and lock preparation, the opening direction, the frame or strike, and the door construction itself. Thickness is the first of these checks, and the other five still have to pass.
Measure and photograph those six points, keep them under one Door ID per opening, and compare them with the drawing of the exact lock configuration you are considering. If something conflicts, you will see it before ordering, and the lock maker can tell you what to change.
Fire, egress and accessibility requirements also shape the hardware choice, so identify them at the same stage.
1. Start With the Real Door, Not the Smart Lock Listing
Most fit problems start when a buyer picks a lock with the right functions or a familiar mortise name and treats the rest as detail. On a real door, thickness, panel width, edge preparation, old holes, frame clearance, strike position, handing or an old repair can each decide the result.
So the first question is:
What exactly is this door and what preparation already exists on it?
A new door can still be on the drawing board. An existing door can already carry holes, a mortise cavity, filler plates, a strike, cladding, reinforcement or repairs. Both can take a smart lock; they need different information.
Start with what the smart lock will replace:
| Proposed change | What to compare with the lock drawing |
|---|---|
| Add an interior actuator while retaining the existing lock | The supported cylinder or deadbolt interface, interior mounting space, retained hardware condition, and any required adapter |
| Replace a bored deadbolt or latch assembly | The existing face and edge holes, backset, door thickness, mounting footprint, and strike |
| Replace a mortise lock or a complete handle-and-panel assembly | The lock-body cavity, faceplate, spindle or cylinder positions, front and rear fixing points, and receiving hardware |
| Fit hardware to glass or a narrow profile | The approved mounting method, supporting material, available space, existing preparation, and keeper arrangement |
Record which components stay and which change: a lock that keeps the existing mortise is checked differently from one that replaces it.
2. Give Every Opening a Door ID
On a multi-door project, measurements, photos and replies quickly drift apart unless each is tied to one opening. Give every opening a stable Door ID before measuring.
A Door ID can include:
- building or project zone;
- floor or room;
- opening number;
- active leaf, on a double door;
- a short revision note if the door has already been modified.
For a single house door, Main Entrance is enough. For an apartment, hotel, commercial or door-factory project, use a structured ID.
one opening → one measurement set → one photo set → one reply
Keep “similar” doors separate until you have checked that they are identical.
Record the evidence source as well as the number
Note how each important value was obtained:
- Measured — physically measured at the opening.
- Drawing — taken from an identified drawing or door schedule.
- Observed — seen on the door, without a dimension.
- Estimated — approximate only.
- Unknown — not yet available.
Add where the measurement was taken or which drawing revision it came from. A measured thickness carries more weight in the decision than an estimated one.
3. Identify the Door Construction Before Measuring Fit
A lock sits very differently on:
- timber or wood doors;
- steel or security doors;
- aluminum-profile doors;
- framed glass doors;
- frameless glass doors;
- double-leaf doors;
- gates;
- clad or decorative doors;
- doors with reinforcement plates or narrow stiles.
Record at minimum:
- door type or construction;
- finished thickness;
- available mounting area on the front and rear;
- edge/profile condition;
- frame and strike condition;
- whether the door is new, existing, repaired, or previously modified.
The construction tells the reader what the numbers mean. A timber door and an aluminum-profile door can share the same overall thickness and still have completely different mounting geometry, and frameless glass is a different case from a narrow aluminum stile.
Compare the opening with the requirements of the exact model and configuration. Our product categories are organized by door type, so you can start from the construction you recorded; glass and narrow profiles are covered in glass door vs aluminum profile smart lock fitment.
4. Measure Finished Door Thickness at the Lock
Thickness decides how the front and rear assemblies span the leaf and how fasteners and spindles reach through it.
Measure the finished door thickness at the actual lock location: the real surface-to-surface dimension with any permanent cladding, at the lock height, on the door as it is now. A nominal sales thickness, a reading taken elsewhere on the leaf or an old drawing can all differ from it. Our model pages give thickness ranges per model: 40–120 mm for A2, 40–90 mm for A11, 35–65 mm for the L1 rim gate lock. If the thickness varies, record each reading.
A lock inside the right thickness range can still be stopped by panel space, an existing hole pattern, the mortise or latch position, the opening direction, the frame, the strike, trim, a reinforcement plate or cable routing. Use thickness as the first screen and carry on with the checks below.
State the unit beside every dimension, keep the original reading next to any conversion, and say whether it is the finished surface or the core. A clear reference point is worth more than a precise-looking number with no location.
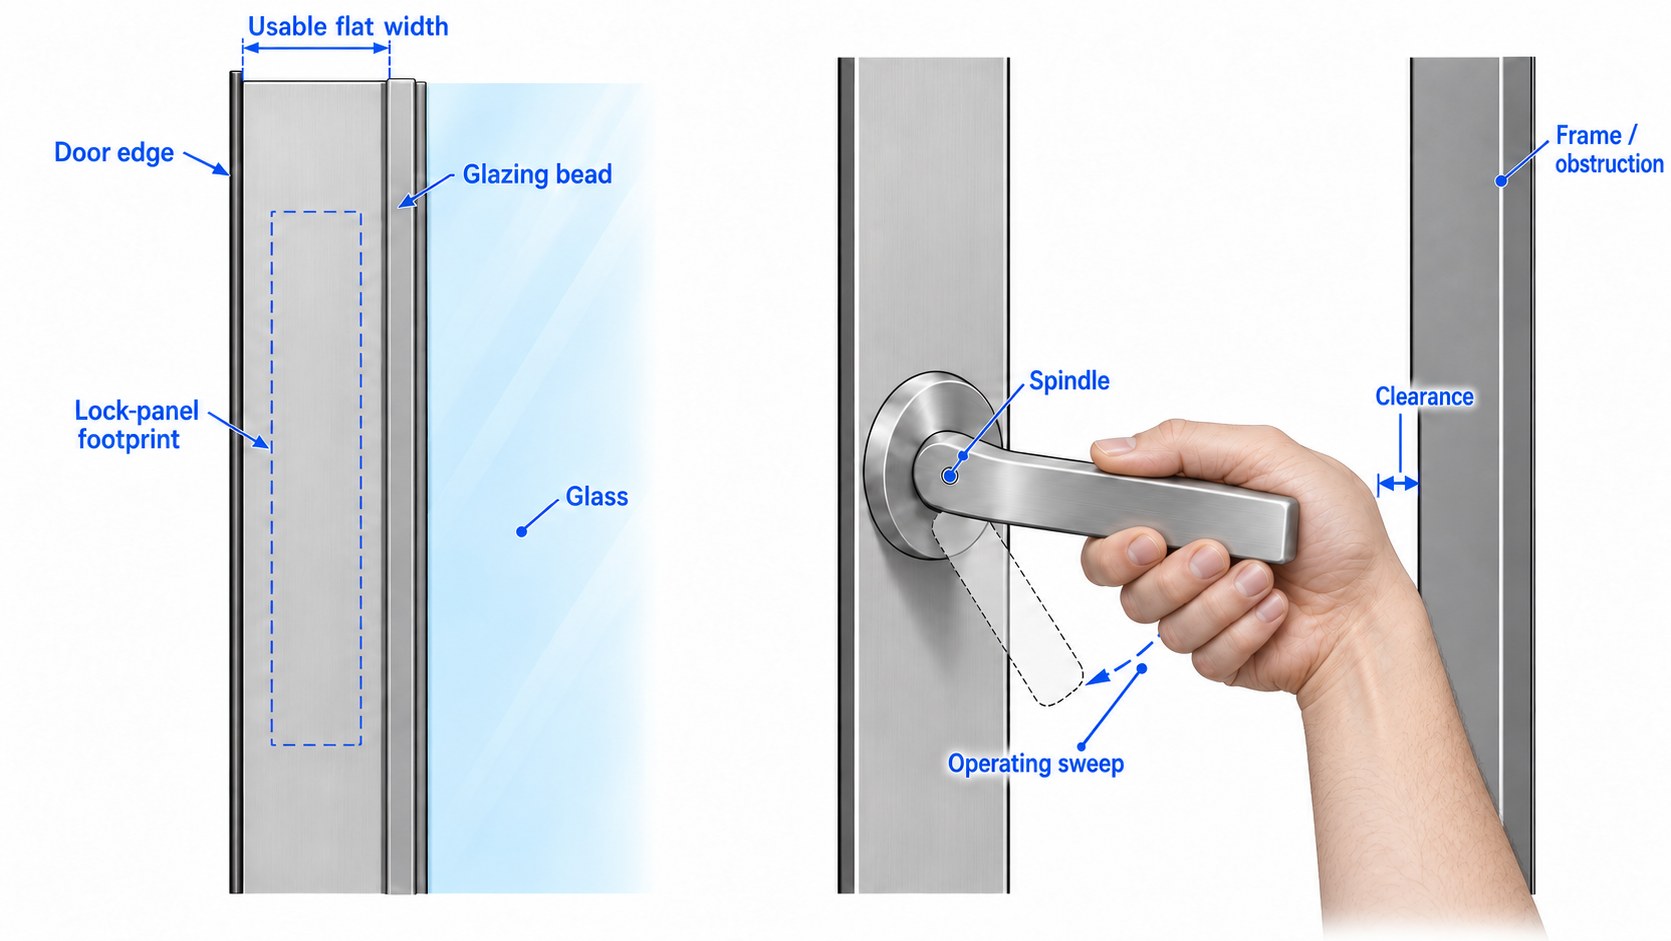
5. Check Usable Panel Space on Both Sides
A smart lock needs flat space on both faces as well as the right thickness.
Record the mounting area around the lock position on both sides, and look for:
- narrow stiles;
- glazing beads;
- decorative moldings;
- raised panels;
- reinforcement plates;
- existing handles or escutcheons;
- edge returns;
- weather seals;
- nearby hardware;
- door closers or accessories in the way.
This matters most on aluminum-profile doors, framed glass and narrow edges, and on retrofits where the old lock covered a different footprint. Check that a larger new panel covers the old holes, by laying the panel footprint from the drawing over the hole pattern.
Where space is tight, send a straight-on photo with a tape in view and mark the available width.
6. Record Opening Direction and Handing Clearly
“Left-hand”, “right-hand”, “left open” and “right open” mean different things to different trades and markets. Write the physical facts instead:
- which side you are standing on;
- whether the door moves toward or away from you from that side;
- which side carries the hinges;
- which edge carries the latch or lock;
- a photo or marked sketch.
If you use “inward” or “outward”, name the space the door opens into. For a double door, also say which leaf will carry the lock.
The full method is in how to identify door handing before ordering a smart lock.
7. Document the Existing Lock Preparation
On a retrofit, the existing preparation matters more than the old lock's brand. Record what is physically on the door now:
- the exterior panel footprint;
- the interior panel footprint;
- through-holes;
- spindle or cylinder holes;
- screw holes;
- the edge mortise cavity;
- faceplate recess;
- latch or bolt position;
- filler plates;
- welded repairs;
- enlarged holes;
- decorative covers;
- reinforcement plates;
- abandoned openings from previous hardware.
Whether each old hole is usable is decided later, against the drawing. The record shows what the new lock must cover, reuse, adapt or avoid.
If the new lock relies on the old preparation being “close enough”, measure it and check it against the exact model's drawing.
Identify the existing lock body and its interface
Where a mortise or latch has to line up with existing preparation, the lock body often decides the fit.
Identify it from its markings, photos or documents, and measure the interface dimensions: typically backset, center distance, faceplate, case depth and spindle or cylinder position. Similar-looking housings can differ at exactly these points, so measure instead of matching by appearance or trade name: our A2 alone takes 6068, 4585, Russian 6585 or Russian 6085 bodies, each with its own case, faceplate and geometry. Our lock bodies and mortises page explains how mortise codes, backset and faceplates are read.
Reading the codes and measuring the cutout are covered in the smart lock mortise, backset and lock body guide, how to measure an existing door and lock cutout and how to identify an existing mortise lock before replacement.
8. Check the Frame, Strike, and Closing Condition
The leaf can take the lock while the opening as a whole still fails. Before buying, look at the receiving side and record:
- frame material and condition;
- existing strike or keeper;
- strike position;
- visible wear marks;
- latch/bolt landing area;
- gap between leaf and frame;
- any sagging, twisting, rubbing, or misalignment;
- whether the current door closes freely.
A shiny scrape around the strike, a binding latch or a door that has to be lifted to close points to a door problem. Fix the alignment first; the new lock inherits it.
On gates and double doors, the “frame” can be another leaf, a post, a keeper box or a fabricated structure. Show exactly what receives the bolt, including any movement in the companion leaf. Outdoor gates also need the exposure and operation checked when choosing the model.
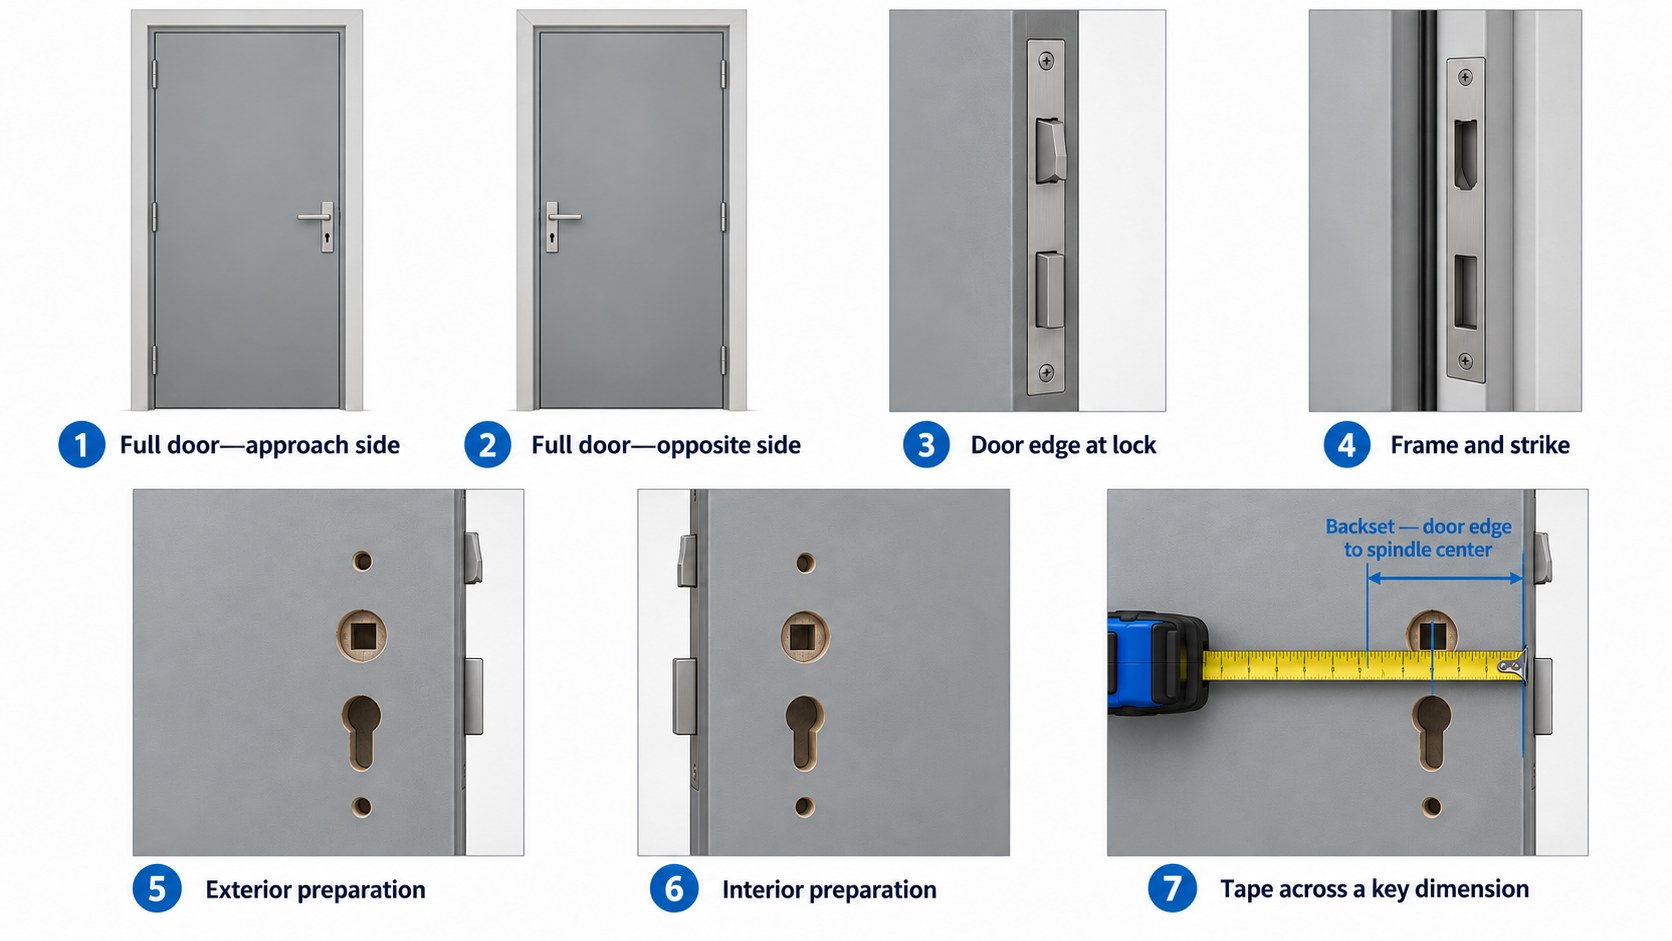
9. Use Photos to Show What Measurements Cannot
A supplier-ready photo set normally shows:
- full door from the approach side;
- full door from the opposite side;
- door edge at the lock position;
- frame and strike/keeper area;
- existing exterior lock preparation;
- existing interior lock preparation;
- one or more measurement-reference photos where a dimension is ambiguous.
For a modified door, also capture:
- filler or repair areas;
- enlarged holes;
- welds;
- reinforcement;
- trim that affects panel seating;
- any hidden condition that becomes visible when existing hardware is removed.
Shoot square to the surface, in good light, without cropping the edge. Photos show condition; the dimensions still come from measurements.
Pair every important photo with the Door ID
On a multi-door project, name or file each image under its Door ID, and pair every close-up with an overall view. Where a photo shows a measurement, mark the endpoints: an angled tape makes a dimension look different from what it is.
10. Prepare a Door Compatibility Record
Before asking “will this lock fit?”, put the door on one page plus photos:
| Field | What to record | Supporting evidence |
|---|---|---|
| Door ID | Unique opening identifier | Same identifier on notes, photos, and drawings |
| Door construction | Wood, steel, aluminum profile, glass, gate, etc. | Observed/drawing |
| Finished thickness | At actual lock position | Prefer measured |
| Usable panel space | Front and rear mounting area | Measured + photo |
| Opening direction | Named viewpoint, toward/away movement, hinge side, lock edge | Observed + photo/sketch |
| Existing preparation | Holes, cavity, faceplate recess, repair/filler | Measured + photo |
| Frame / strike | Material, current keeper, alignment condition | Photo + notes |
| Existing hardware | Current lock/mortise/latch if identifiable | Photo/model info |
| Candidate model | Exact model/configuration and components being retained | Model documentation or quotation |
| Project constraints | Fire-rated opening, egress, accessibility, or other requirements affecting selection | Available labels, specifications, and responsible reviewer |
| Status | Current compatibility conclusion and any hold | Reason tied to the identified opening |
| Fit confirmation | Exact model/revision reviewed and open items | Written reply |
Keep missing dimensions visible as “unknown”, so nobody mistakes them for confirmed data later.
11. Screen the Door Yourself First
Five quick questions catch most problems before the record goes out:
1. Is the door itself sufficiently identified?
If you cannot tell which opening the measurements belong to, fix that first.
2. Are the dimensions measured and the operating conditions observed?
Thickness, panel space and preparation should be real readings. Opening direction and closing condition are observations. Mark anything guessed as estimated or unknown.
3. Is the existing preparation clear?
If old hardware still hides the cutout, or a repair hides the original geometry, measure again once it is exposed.
4. Is there an obvious physical conflict?
For example, a panel wider than the stile, a case deeper than the cavity, a strike area that cannot take the bolt, or a handing that does not match the proposed configuration.
5. Is there a specialist constraint that this compatibility review should not decide?
Fire-rated openings, egress, accessibility, door-factory production and project approvals belong with the responsible project professional. Raise them during selection.
For example, the U.S. Access Board's ADA guidance covers door and gate hardware operation, maneuvering clearances and opening force. That review sits alongside the dimensional check on U.S. projects. [2]
12. Separate Missing Information From a Confirmed Conflict
These labels keep the status of each door clear:
| Status | Meaning | Buyer action |
|---|---|---|
| Screened candidate | No obvious blocker found; the exact opening is still to be reviewed | Send the door record for review |
| Conditionally compatible | The candidate works if one known condition is answered or adapted | Hold release until that condition is answered |
| Confirmed against measured opening | The exact model and configuration have been reviewed against this opening and its current record | Proceed to the next project stage |
| More information needed | A critical dimension, hidden condition or project requirement is open | Collect the missing information |
| Not compatible as proposed | The current model or configuration conflicts with the opening | Choose an alternative or an assessed modification |
A missing cutout measurement pauses the decision; a panel that cannot sit on the stile is a real conflict. Keeping the two apart stops you rejecting a workable lock too early or waving through a known mismatch.
A confirmation covers the opening, configuration and record reviewed. Note whether it came from documents, a site visit or a trial fit, and keep any installation checks still to do on the list.
13. What a Fit Confirmation Should Cover
One dimension never settles fit. The service manual for Schlage's CS210 mechanical locks, for example, lists door range, backset and center-to-center preparation as separate requirements. [1] Every lock has several interfaces like these.
A good confirmation names the Door ID and the exact model and configuration, and answers each of these:
- whether the provided thickness and mounting area are acceptable;
- whether the existing preparation can be retained, modified, or must be reworked;
- whether the proposed mortise/latch/lock body matches the opening;
- whether handing/opening direction is compatible;
- whether the frame/strike condition shown is workable;
- any door preparation that still requires a model-specific drawing;
- any unresolved field that prevents confirmation.
Where rework is needed, it says what changes and which drawing or dimension controls it. “Standard size” or “should fit” confirms nothing about a specific door.
14. Three Common Door Scenarios
The same lock model needs a different depth of review depending on the opening:
| Scenario | What makes it easier or harder | Appropriate compatibility conclusion |
|---|---|---|
| New door with no preparation yet | The door can still be prepared to suit the lock, so the selected model's drawing controls the preparation | Screen the candidate, then coordinate the model drawing with the door factory |
| Existing door with clean, measurable preparation | Thickness, holes, edge, frame and current hardware can all be documented directly | Usually reviewable from a complete door record |
| Existing door with repairs, enlarged holes, filler, or mixed hardware | The visible opening may no longer match the original preparation | Conditional until the retrofit approach is checked against the exact model |
Worked example: two candidates for the same existing door
Take a 45 mm timber door, inside the thickness range of both our A2 IP66 waterproof smart lock (353 × 73 mm panels, 40–120 mm doors) and our A11 profile door smart lock (290 × 40 mm panels, 40–90 mm doors). The buyer has photographed both sides, recorded the old preparation and found a raised molding beside the interior handle.
| Review finding | A2 | A11 |
|---|---|---|
| Thickness | Falls within the stated range | Falls within the stated range |
| Interior mounting area | The 73 mm rear panel overlaps the molding | The 40 mm rear panel clears the molding on the dimensioned drawing |
| Existing preparation | Old fixing points are documented, and the mounting conflict remains | A concealed fixing area is still to be exposed and measured |
| Purchasing conclusion | Not compatible as proposed; consider a different housing or an assessed door modification | More information needed; obtain the missing measurement before requesting confirmation |
Thickness passes for both. A2 has a known conflict on this door; A11 has one open question. Neither the feature list nor the price changes that, so the next step is the missing measurement.
For a new door, the same check runs against the planned finished construction and the lock drawing before preparation starts. For an existing door, it runs against the door as it is now, repairs included.
15. Resolve Questions That Need a Specialist
Some findings need a closer look. Send the relevant record with one specific question.
Mortise, backset, center distance, and lock-body geometry
Where existing preparation stays, compare it with the lock-body drawing of the proposed model. Two lock bodies with the same name can still differ, so compare the dimensions.
Conflicting handing descriptions
Send a marked photo or sketch showing viewpoint, hinge side, lock edge and movement, and match the configuration to that description.
Hidden or uncertain existing preparation
If a cover or old lock hides a critical area, mark it unknown and have a qualified person expose and measure it when it is safe to do so.
Glass-door versus aluminum-profile fitment
Establish whether the lock mounts to glass, a profile or another structure, and check clamping or drilling, mounting space and the receiving side for that system before modifying the door.
Model-specific installation
Use the installation drawing and instructions for the selected configuration for preparation, fastening, wiring and setup. A compatibility reply is a review; drilling follows the template. Our installation page lists what to measure for each door type and the order of fitting.
Fire-rated openings, egress, and accessibility
Flag these at selection. Send the door labels, project requirements and proposed hardware to the responsible reviewer: a physical fit check does not tell you whether the modified opening still meets its required performance and the rules that apply.
Door-factory production and project purchasing
Pass the door record and the fit confirmation to the team coordinating door and lock, and agree who resolves open drawing questions before cutting. A confirmation for one opening applies to that opening; a similar door gets its own check. The factory side is covered in the smart lock integration guide for door factories.
16. Pre-Purchase Checklist
Before ordering a smart lock for a real opening, the file should contain:
- Door ID
- Door construction/type
- Finished thickness at the lock position
- Usable front and rear panel space
- Opening direction with viewpoint/hinge side
- Existing cutout and hole condition
- Current mortise, latch or lock-body information
- Frame and strike/keeper condition
- Full-door and close-up photos
- Candidate model/configuration
- Open specialist constraints
- Current compatibility status
- Fit confirmation tied to the exact opening
Frequently Asked Questions
Can I tell compatibility from photos?
Partly. Photos show the door construction, edge, old holes, repairs, frame and strike, and mounting space. The dimensions that control fit still need measuring.
What if my existing door has already been drilled for another lock?
Record every hole, cavity, recess, repair, filler plate and panel footprint, then check the new model's drawing against that preparation. Many retrofits work; the record shows which ones need an adapter or rework.
Should I measure backset and center distance on every door?
Measure them on mortise doors and wherever the existing preparation is reused. The model's lock-body drawing shows which interface dimensions control the fit and where they are measured from.
Who decides whether the lock is compatible?
The buyer provides accurate door data, and the lock maker confirms the exact model and configuration against it. Fire, egress, accessibility and door-factory requirements stay with the project specialists responsible for them.
Keep the Record With the Order
A good compatibility record names the opening, the exact lock configuration and any open question, and it travels with the order. Send it to us with the model you are considering, and keep our reply with the measurements and photos. If the door, the retained hardware or the configuration changes, send the changed details for a fresh check.
References
- Schlage. CS210 Series Service Manual, p. 4, model-specific preparation and interface requirements.
- U.S. Access Board. Guide to the ADA Accessibility Standards: Entrances, Doors, and Gates, sections on maneuvering clearances, door and gate hardware, and opening force.