Article contents 17 sections
A packaging and label inspection compares three records for each sampled set: what is physically in the box, what the labels and documents say is in the box, and what the order calls for. When all three agree, and the protective packing matches the approved pack, the set passes.
Counting cartons catches very little of this. A shipment can hold the right number of cartons with the right exterior panel paired to the wrong mortise body, two accessory bags with the same part count and different spindle lengths, or a barcode that scans cleanly and names another configuration. Below is how to inspect kits, labels, manuals, protective packaging and shipping marks for importers, distributors and door manufacturers, and how to correct a mismatch without losing track of what was found. Sampling, defect classes and the overall release decision are in the smart lock pre-shipment inspection checklist.
What Should the Packaging Inspection Cover?
The inspection works at three levels. The individual lock set has to be complete and correctly identified; the shipping carton has to hold the stated assortment and quantity; the pallet or other transport unit, where one is used, has to keep the cartons together and let the receiver reconcile the delivery.
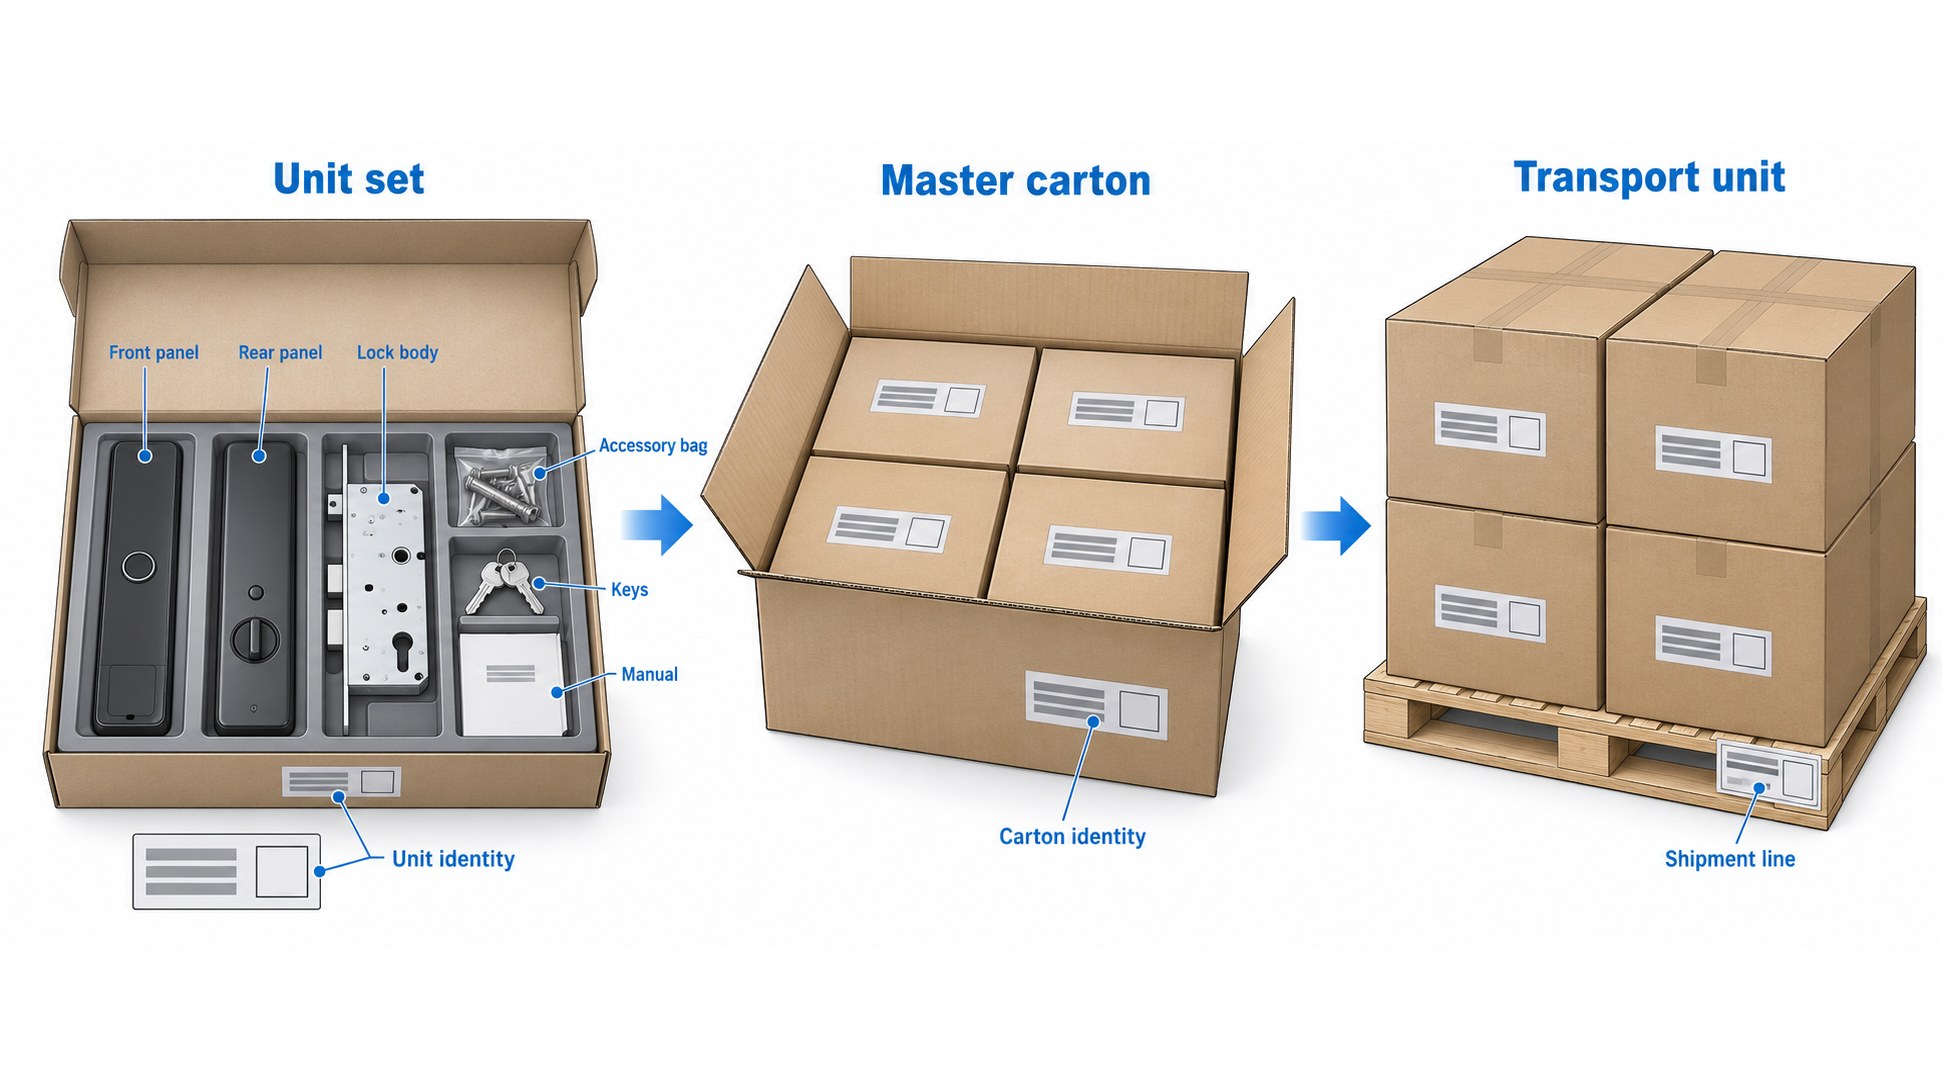
| Inspection area | Compared against | Typical discrepancy |
|---|---|---|
| Lock configuration | The order variant | Wrong finish, handing, lock body or power arrangement |
| Installation kit | The packing list, part by part | Missing spindle, wrong screw length, mismatched strike |
| Keys and credentials | The lock set they belong to | Keys swapped between sets, wrong card pack |
| Unit labels | Artwork and order records | Wrong variant, duplicate serial number, claim that does not apply |
| Barcodes and QR codes | The data assigned to them | Readable code linked to another item or to old instructions |
| Manuals and templates | The assembly in the box | Wrong lock-body drawing or setup instructions |
| Protective packaging | The approved pack | Loose metal parts, pinched cables, unsupported trim |
| Cartons and shipping marks | Carton and shipment records | Right total, wrong mix of variants |
| Repacking and correction | The corrected records | Old labels left on, accessories lost during inspection |
The checklist follows what was ordered. If the order leaves out a gateway, battery or lock body on purpose, its absence is correct, even when another product's package includes one.
Establish the Correct Packing Reference
Inspection starts with the packing specification for each variant: the lock assembly, installation kit, documents, unit box, carton quantity and labels. For parts that look alike, the reference names them by part number or drawing. “One accessory bag” says nothing about which fasteners are inside it, and “standard mortise” does not say which body; a code such as 4585 or 6068 together with the lock model does, because two bodies with the same code can still differ in case depth, spindle and bolt layout (see our mortises and lock bodies).
Before the first sample is opened, the reference settles these points:
- which items are packed per lock, per carton, or separately for the project;
- whether lock bodies, gateways or other accessories travel in their own packages;
- which labels identify a product type, an individual unit or a logistics unit;
- whether cartons hold mixed variants, and how those are separated;
- the manual languages, document revisions and private-label artwork;
- whether batteries are installed, packed loose, isolated or shipped separately;
- the approved packing materials, carton construction and closure.
The reference belongs to the current order revision. An older approved sample still shows the intended appearance, but a later written change to the kit or packaging overrides it. Where two documents disagree, settle the conflict first: when a packing list calls for a separate mortise body, an empty compartment in the box is a finding to resolve; the inspector cannot assume it is intentional.
1. Open Samples Without Losing Their Identity
Draw the samples from the packed shipment under the inspection plan, covering each variant and packing arrangement; a demonstration carton only shows how the pack was meant to look.
Photograph each carton unopened, with its label, closure and condition, and note its carton identifier and position in the shipment. Once it is open, keep each unit box, lock assembly, accessory bag, manual and key set together, either one set at a time on a clear bench or in separated positions for several sets. When spindles and keys from different boxes end up in one pile, nobody can tell whether a discrepancy came from the factory or from the inspection.
Photograph the contents before rearranging them. A loose screw resting on a finished panel is evidence of the packing condition, even after someone drops it back into its bag.
If packing is unfinished, keep finished packages and unpacked stock apart in the record. Loose products can show identity and quantity; the kits and labels in the final cartons still have to be inspected once they are packed.
2. Check the Actual Lock Configuration
Start with the physical product, then compare it with its unit label and box label. Two labels that agree with each other and both describe the wrong contents are still a failure.
The fields to compare are the ones that separate the ordered variants: panel style, finish, handing where it is fixed, lock body, handle arrangement, power components and any connectivity accessories. Where variants look alike, identify them by part marking or drawing. A panel carrying the expected commercial name can still be paired with the wrong lock body, so on orders with several door thicknesses or mortise options, check the mating parts against the approved assembly record. Our A2 IP66 waterproof smart lock, for example, takes the 6068 entrance body, also used on R1, R2, R8, G1, G2 and G3, or a 4585 or Russian mortise, while the profile-door models take narrow bodies matched to their panels; a box that pairs a profile panel with a 6068 body fails here.
Packaging graphics say nothing about a hidden electronic configuration. Where only a software readout or a function check can tell two versions apart, link the finding to that inspection result, and record the field as unverified when nothing available can show it.
On private-label orders, the inspector works from a written mapping between the buyer's SKU and the manufacturer's configuration. Two commercial names can legitimately cover the same configuration once that equivalence is in the order records.
3. Verify Accessories by Identity and Quantity
Lay out the kit and compare it line by line with the packing reference, for count and for the features that decide whether each part can be used.
| Component group | What to check | Why counting misses it |
|---|---|---|
| Spindles and connecting shafts | Profile, length, end features, assembly they belong to | The right number of spindles can be the wrong length |
| Screws, posts and sleeves | Thread, length, head style, position | A similar screw can bottom out or fall short |
| Mortise body or latch | Variant, orientation, mating interfaces | A body that looks the same can have different geometry |
| Strike and receiving parts | Type, fixings, covers | A strike from another assembly fits the box, not the door |
| Gaskets and mounting plates | Shape, openings, orientation, condition | The wrong plate can block cables or fixing points |
| Cables and power accessories | Connector, part identity, condition | A connector that fits can still be the wrong part electrically |
| Keys, cards and other credentials | Quantity, which set they belong to, delivery state | Correct totals can hide swaps between sets |
Dimensional checks use the drawings or parts specification; a measurement from one opened bag never becomes a new tolerance. Sealed accessory bags are opened as the inspection plan sets out, since a printed bag label can be right while the contents are wrong. Bags that are opened get their contents and protection restored before repacking.
On mixed orders, spindle length is easy to get wrong, because two lengths look alike in a sealed bag. In 2024 a European door manufacturer ordered 1,500 smart gate locks from us: 600 with a spindle 5 mm longer and 900 with the original length. We issued two marked sub-versions, kept them apart through material issue, assembly and packing, and checked carton marks, packing lists and accessories for each group (quality and testing). A packaging inspection of an order like that samples both groups and measures the spindle in each.
Separate Installation Parts from Spares
Some orders carry one installation kit per lock plus spare parts packed in bulk. The two quantities are inspected and reported separately. A carton of spare screws does not make up for short retail kits, because an installer expects every box to be installable on its own; and an item supplied once in a project hardware pack is correctly absent from each lock box. Reporting at the right level keeps a surplus across the shipment from hiding a shortage in individual sets. Spare bodies, strikes, kits and cards can be packed and labeled with our orders; for projects we recommend a spare set per door group, labeled with the lock model and body code.
Preserve Key and Credential Association
Mechanical keys stay with the lock or cylinder they belong to. Where the order has keyed-alike groups, the group schedule shows which keys should operate which units, and the inspection checks against it.
Cards arrive blank or enrolled according to the delivery state in the order. The packaging check covers the right items and their association with the set; whether they open the lock belongs to the functional inspection.
Keep usable setup codes and access secrets out of general inspection photos; record enough to trace the item and keep the rest in the controlled record.
4. Reconcile Product, Box and Carton Labels
Read each label field by field: product identity, variant, quantity, lot or serial information and any destination fields, compared with the order data.
The fields differ by level on purpose. A unit serial number identifies one device; a carton identifier identifies a package of several. What has to be right is the link between them. Trace a sampled unit through the packing record, from its identity to its unit box, carton and shipment line. Where the buyer needs serial-to-carton mapping, the record has to list the units that were actually packed; a serial list printed before packing shows what was planned.
Permanent product labels need to be readable and kept clear of controls, moving parts, mounting surfaces and other required markings. Check unit-box labels after the box is closed, because a label across an opening edge tears in ordinary handling. Our cartons are labeled by model, finish and version, and on project orders by door group as well, so receiving teams can allocate them on arrival (global project support).
Claims printed on the packaging are compared with the evidence for the configuration in the box. A certificate logo, an IP rating or a feature icon carried over from an earlier design goes to review, and the fix is the correct artwork, never another product's marking copied across.
5. Inspect Barcodes and QR Codes in Three Separate Steps
Check the Decoded Content
Scan the code, record the decoded value and compare it with the data assignment and the physical item. This is the step that catches a code that reads perfectly and names the wrong SKU or unit.
Each identifier has its own job. In the GS1 system a GTIN identifies a trade item and an SSCC identifies a logistics unit, and neither replaces a manufacturer's device serial number. Apply the identifiers the buyer's receiving system uses; a shipment needs only the GS1 identifiers its buyer requires. GS1 Logistic Label Guideline
Where a field should be unique, look for duplicates across the records. The same product-type code on identical units is normal; a repeated individual serial number is a finding. A sample scan can find a duplicate, but proving uniqueness across the shipment takes full coverage or the complete serial records.
Check Readability in the Finished Pack
Read the code where it sits in the final pack. Creases, print damage, labels wrapped round a corner and reflections from the outer wrap all interfere, and tape, straps or another label can cover it. Use the buyer's receiving scanner or a representative reader where one is available, and note the conditions; one phone reading it says little about every warehouse scanner.
When the buyer requires formal barcode verification, use the verification method and grade they specify. GS1's verification guidance covers both print quality and encoded-data integrity; a routine scan is a receiving check, not formal verification. GS1 Barcode Verification Process Implementation Guidelines
Check What a QR Code Actually Does
A QR code can open instructions, launch an app page, identify a device or carry onboarding data, and it is tested for the job it was printed for. A documentation link has to open, show the product in the box and offer the right language. A device onboarding code is checked by the approved method, without binding the device to an inspection account.
If a scan changes the lock's account or provisioning state, restore the delivery state afterwards. A code that sends the buyer to outdated instructions, or leaves the lock assigned to the wrong account, fails however well it reads.
6. Check Manuals, Installation Templates and User Information
The manual in the box has to let the receiver install and set up that assembly. Compare its document number and revision with the reference, then read the parts most likely to cause a wrong installation: the lock-body drawing, mounting sequence, cable routing, battery information, handing, first setup and backup operation. One manual for several variants works when the reader can tell which instructions apply to their lock. On private-label orders we match the manual to the exact configuration and check its language against the approved sample.
Drilling and installation templates are checked for the right variant and for scale, because printing can change size. Our installation guide tells installers to measure a printed template's scale bar or a marked dimension before use; the inspector does the same on the packed template.
Completeness matters as much as language. A missing reverse side, a cropped drawing or faint dimension lines make a correct revision unusable. A quick-start card replaces the full manual only where the order says so, and a printed document the order specifies stays printed, even if a QR code to the same content is added.
7. Inspect Inner Packaging Around the Lock's Vulnerable Areas
The inner pack should reproduce the approved arrangement: inserts, bags, films, dividers and protective caps where the pack has them. Look closely at handles, projecting shafts, readers, decorative surfaces, battery covers and cable exits. A cavity that holds the main panel well can still press on a connector once the lid is closed.
Metal parts that can move against a finished surface are a defect. Heavy lock bodies should be separated from panels, and a protective film on its own is too thin a barrier against a loose hardware bag. Cables go into their spaces without pinching, sharp folds or strain on the connector; close the package normally and look for a cable trapped by the insert or cover. A lid that has to be forced shut means the pack is wrong, and it is recorded that way.
Record cracked inserts, collapsed supports, contamination and moisture damage. Where the pack includes moisture-control material, check its type, quantity, position and condition against the specification; a handful of extra desiccant is no substitute for the packaging design. Films and tapes should match the approved pack too, because their contact with finishes, printed labels and transparent reader covers shows up in storage and on removal, even when the box looks tidy today.
8. Verify Master Cartons, Assortments and Shipping Marks
Count the unit boxes in each sampled carton and compare their variants with the carton label and packing record. For mixed cartons the assortment is the check; a correct total alone passes the wrong mix.
Carton construction, dimensions and closure are compared with the packing specification. Record crushed corners, punctures, split seams and signs of water. The carton should be neither overfilled nor left with uncontrolled empty space.
Where weights are part of the inspection, state whether the figure is product net weight, packed carton gross weight or a pallet total, and use a suitable scale and an agreed tolerance. A low carton weight flags a possible shortage, but a similar-weight substitute or normal packaging variation can hide one, so weighing supports the contents check and never replaces it.
Shipping marks identify the shipment and destination in the fields the buyer requires. Carton numbering, quantities, units and handling marks are compared with the packing list, and conflicting old routing labels are removed or cancelled through the correction process.
On pallets, inspect the loading pattern, overhang, support, restraint and whether the required labels can be seen. Straps should hold without cutting carton edges or crushing the contents. A neat outer wrap shows nothing about the assortment in the cartons underneath.
For international shipments on wood packaging, work out which parts fall under wood-packaging rules. IPPC's ISPM 15 covers raw-wood packaging, including dunnage, and excludes some processed wood such as plywood; on a pallet with a plywood deck and solid-wood supports, the supports still fall under the standard. IPPC adopted standards: ISPM 15
9. Check the Actual Battery Shipping Arrangement
Establish first what is physically shipped: no batteries, batteries installed in the lock, batteries packed with it, or batteries in a separate package. On our range, A11 (lithium version), R9, R1, R2, R8, the A7 face version and the four double-sided models use lithium batteries, and the others use four AA or AAA cells, so one mixed order can carry two different battery arrangements. Compare what is in the box with the approved packing and transport documents.
Inspect the protection against movement, short circuit and accidental activation. If an insulating tab or other isolation was removed during functional inspection, restore it before the box is closed.
For air transport, battery requirements follow the battery type and configuration, with its rating or content information. IATA's guidance covers classification, packing, marking, labeling and documentation; apply the requirements for the actual consignment and carrier instead of copying a lithium-battery label from another carton. IATA battery shipping guidance
A mismatch between the physical arrangement and the transport paperwork is recorded for resolution. A sticker added on top corrects neither the battery configuration nor the shipping compliance.
10. Distinguish Packing Inspection from Transport Testing
A pre-shipment packaging inspection shows that production packs match the approved design and have no visible packing defects. How the pack stands up to vibration, compression, shock or a particular route is a question for transport testing.
ISTA separates screening procedures from transport simulation procedures, and the choice depends on the product, its package and the distribution conditions. A generic drop test without the ISTA sequence and criteria is reported as a drop test, not under an ISTA procedure name. ISTA test procedures
Where the purchase calls for a packaging test report, compare the tested configuration with the production pack: product mass and layout, inserts, carton, closure and any pallet arrangement the test included. A report on a materially different pack covers that pack, not yours.
If the shipment checks include physical package testing, record the method, sample, conditions, results and what happened to the tested packages; a damaged or destructively tested package goes to its own disposition, never quietly back into stock. A packaging change made after testing is reviewed for whether the test still covers it.
Handle Mismatches and Missing Parts at Their Source
Record each discrepancy before anyone corrects it: carton, unit and item, the requirement, the condition found, and photos that keep the item and its box together.
Then state the effect. A missing decorative insert, a missing spindle and a wrong onboarding code have very different consequences, and each is classed by the agreed defect classification, neither dismissed as cosmetic nor all given the same severity.
Next comes the population that could be affected. A wrong label file can affect a whole print run; a mixed accessory bin can affect several cartons or variants. The correction covers everything the evidence points to, not just the samples that happened to show the problem. At our factory a nonconforming product leaves the normal release route, and when an issue can affect a batch we trace it through production and components; our head of quality can hold the batch until corrective action and reinspection are complete.
Example: Correct Total, Incorrect Assortment
Take an order of four cartons, each meant to hold eight sets: six A11 profile-door locks and two A11 Double-Sided, so 24 A11 and eight A11 Double-Sided, 32 in all.
One carton holds eight single-sided A11 sets instead. The shipment still has 32 sets, but the assortment is now 26 and six, and counting cartons would miss it. The correction restores the approved assortment and brings the carton labels and packing records back in line; adding two double-sided sets without taking out two single-sided ones would only create a second discrepancy.
Example: Missing Parts Found During Sampling
Two sampled kits are missing their spindle. Adding two spindles fixes those two kits and says nothing yet about the other kits packed at the same workstation.
The investigation covers the packing period, the parts supply and the cartons involved. The factory's containment and sorting coverage is recorded, the agreed reinspection follows, and the results of the targeted sort stay separate from the original sample results.
Example: A Readable but Wrong Label
A unit box scans cleanly, but the code is assigned to another configuration. Reprinting from the same data file would print the same fault.
Correct the data assignment against the physical contents first. After relabeling, scan again, read the printed description and reconcile the carton record, then look for other boxes printed from the same label source.
Reinspect and Repack Without Introducing New Errors
Reinspection checks the correction and everything around it that the correction could have disturbed: a replaced accessory bag gets a contents check, a changed unit label gets a scan and a comparison with the lock, and a repacked carton gets its assortment and quantity counted again.
Removed labels and rejected packaging are kept where they cannot drift back into use, and corrected, unchecked and accepted goods stay identifiable throughout.
Before each opened set is resealed, account for its lock, accessories, keys and documents, and restore the protective materials, cable positions and any battery isolation. Sets that went through functional testing have their test credentials and account bindings cleared before packing.
Record the final carton identity and any change to contents or serial mapping, and keep the original inspection result, the correction record and the reinspection result together. A correction adds evidence to the file; the original discrepancy stays in it.
What the Packaging Inspection Report Should Contain
The report names the shipment, the revisions of the packing references, the variants covered and the number of cartons and sets examined. External carton checks, opened-kit checks, scan checks and any formal verification or physical tests are reported separately, because their coverage usually differs.
Photos show the unopened package, its label, the opened arrangement and the contents, with close views and readable identifiers for each discrepancy. A photo of loose parts with no link to their box is of little use.
Report actual counts, mismatches, missing items, condition defects, unresolved checks and corrections, and note any unfinished packing stage or missing reference that limited the inspection.
The acceptance question is whether the shipment meets the agreed packing and identification requirements at the agreed inspection coverage. Packaging results then join the functional, quantity and other checks in the shipment decision.
Frequently Asked Questions
What should be inside a smart lock package?
Usually the front and rear panels, the lock body, the spindle and fixing screws, the strike, keys, any cards, the power components and the instructions. On our locks every finished unit is checked for its spindle, screws, keys, cards, strike and other ordered items before packing; the kit list in your order is the final reference, because projects sometimes ship bodies or spares separately.
Should every carton contain only one smart lock variant?
No. Mixed cartons work well when the assortment is approved, marked on the carton and matched by the packing record. What fails is an unrecorded mix, even with the right total.
Are scratches on the outer carton always a failed inspection?
No. Superficial scuffs are judged against the agreed requirements and their effect on protection, identification and presentation; a puncture, a wet carton or a crushed support is a defect. Retail boxes that are part of the product presentation can carry stricter appearance requirements.
What should the receiver do if cartons arrive damaged or short?
Report it to the seller promptly with photos, keeping the cartons, labels and packing. For our shipments, visible damage or shortage is reported within seven days of delivery, with the packaging, labels and photos kept.
References
- GS1 — Logistic Label Guideline. Identifier roles and logistics-label relationships within the GS1 system.
- GS1 — Barcode Verification Process Implementation Guidelines. Guidance covering barcode quality and encoded-data integrity.
- IPPC — Adopted Standards, including ISPM 15. Scope of regulated wood packaging and processed-material exclusions.
- IATA — Batteries. Air-shipping guidance for battery configuration, packing, marks and documentation.
- ISTA — Test Procedures. Differences between packaging screening and transport simulation procedures.